RumptyCloud buckets are S3-compatible object storage for images, documents, HTML, and video. You upload once, then serve files from a permanent CDN URL (public buckets) or from a time-limited signed URL (private buckets). In this guide we will create a bucket, upload files from the console, sync a local folder with the Rumpty CLI, and connect an SDK with access keys.
Official product docs: Buckets, Create a Bucket, and Uploading & Access Keys.
What you will need
Before you begin, make sure you have:
- A RumptyCloud account and workspace
- A few sample files to upload (an image is enough to follow along)
- Optional: the Rumpty CLI if you want to sync a folder from your terminal
- Optional: the AWS CLI or an S3 SDK if you want programmatic uploads
1. Create a bucket
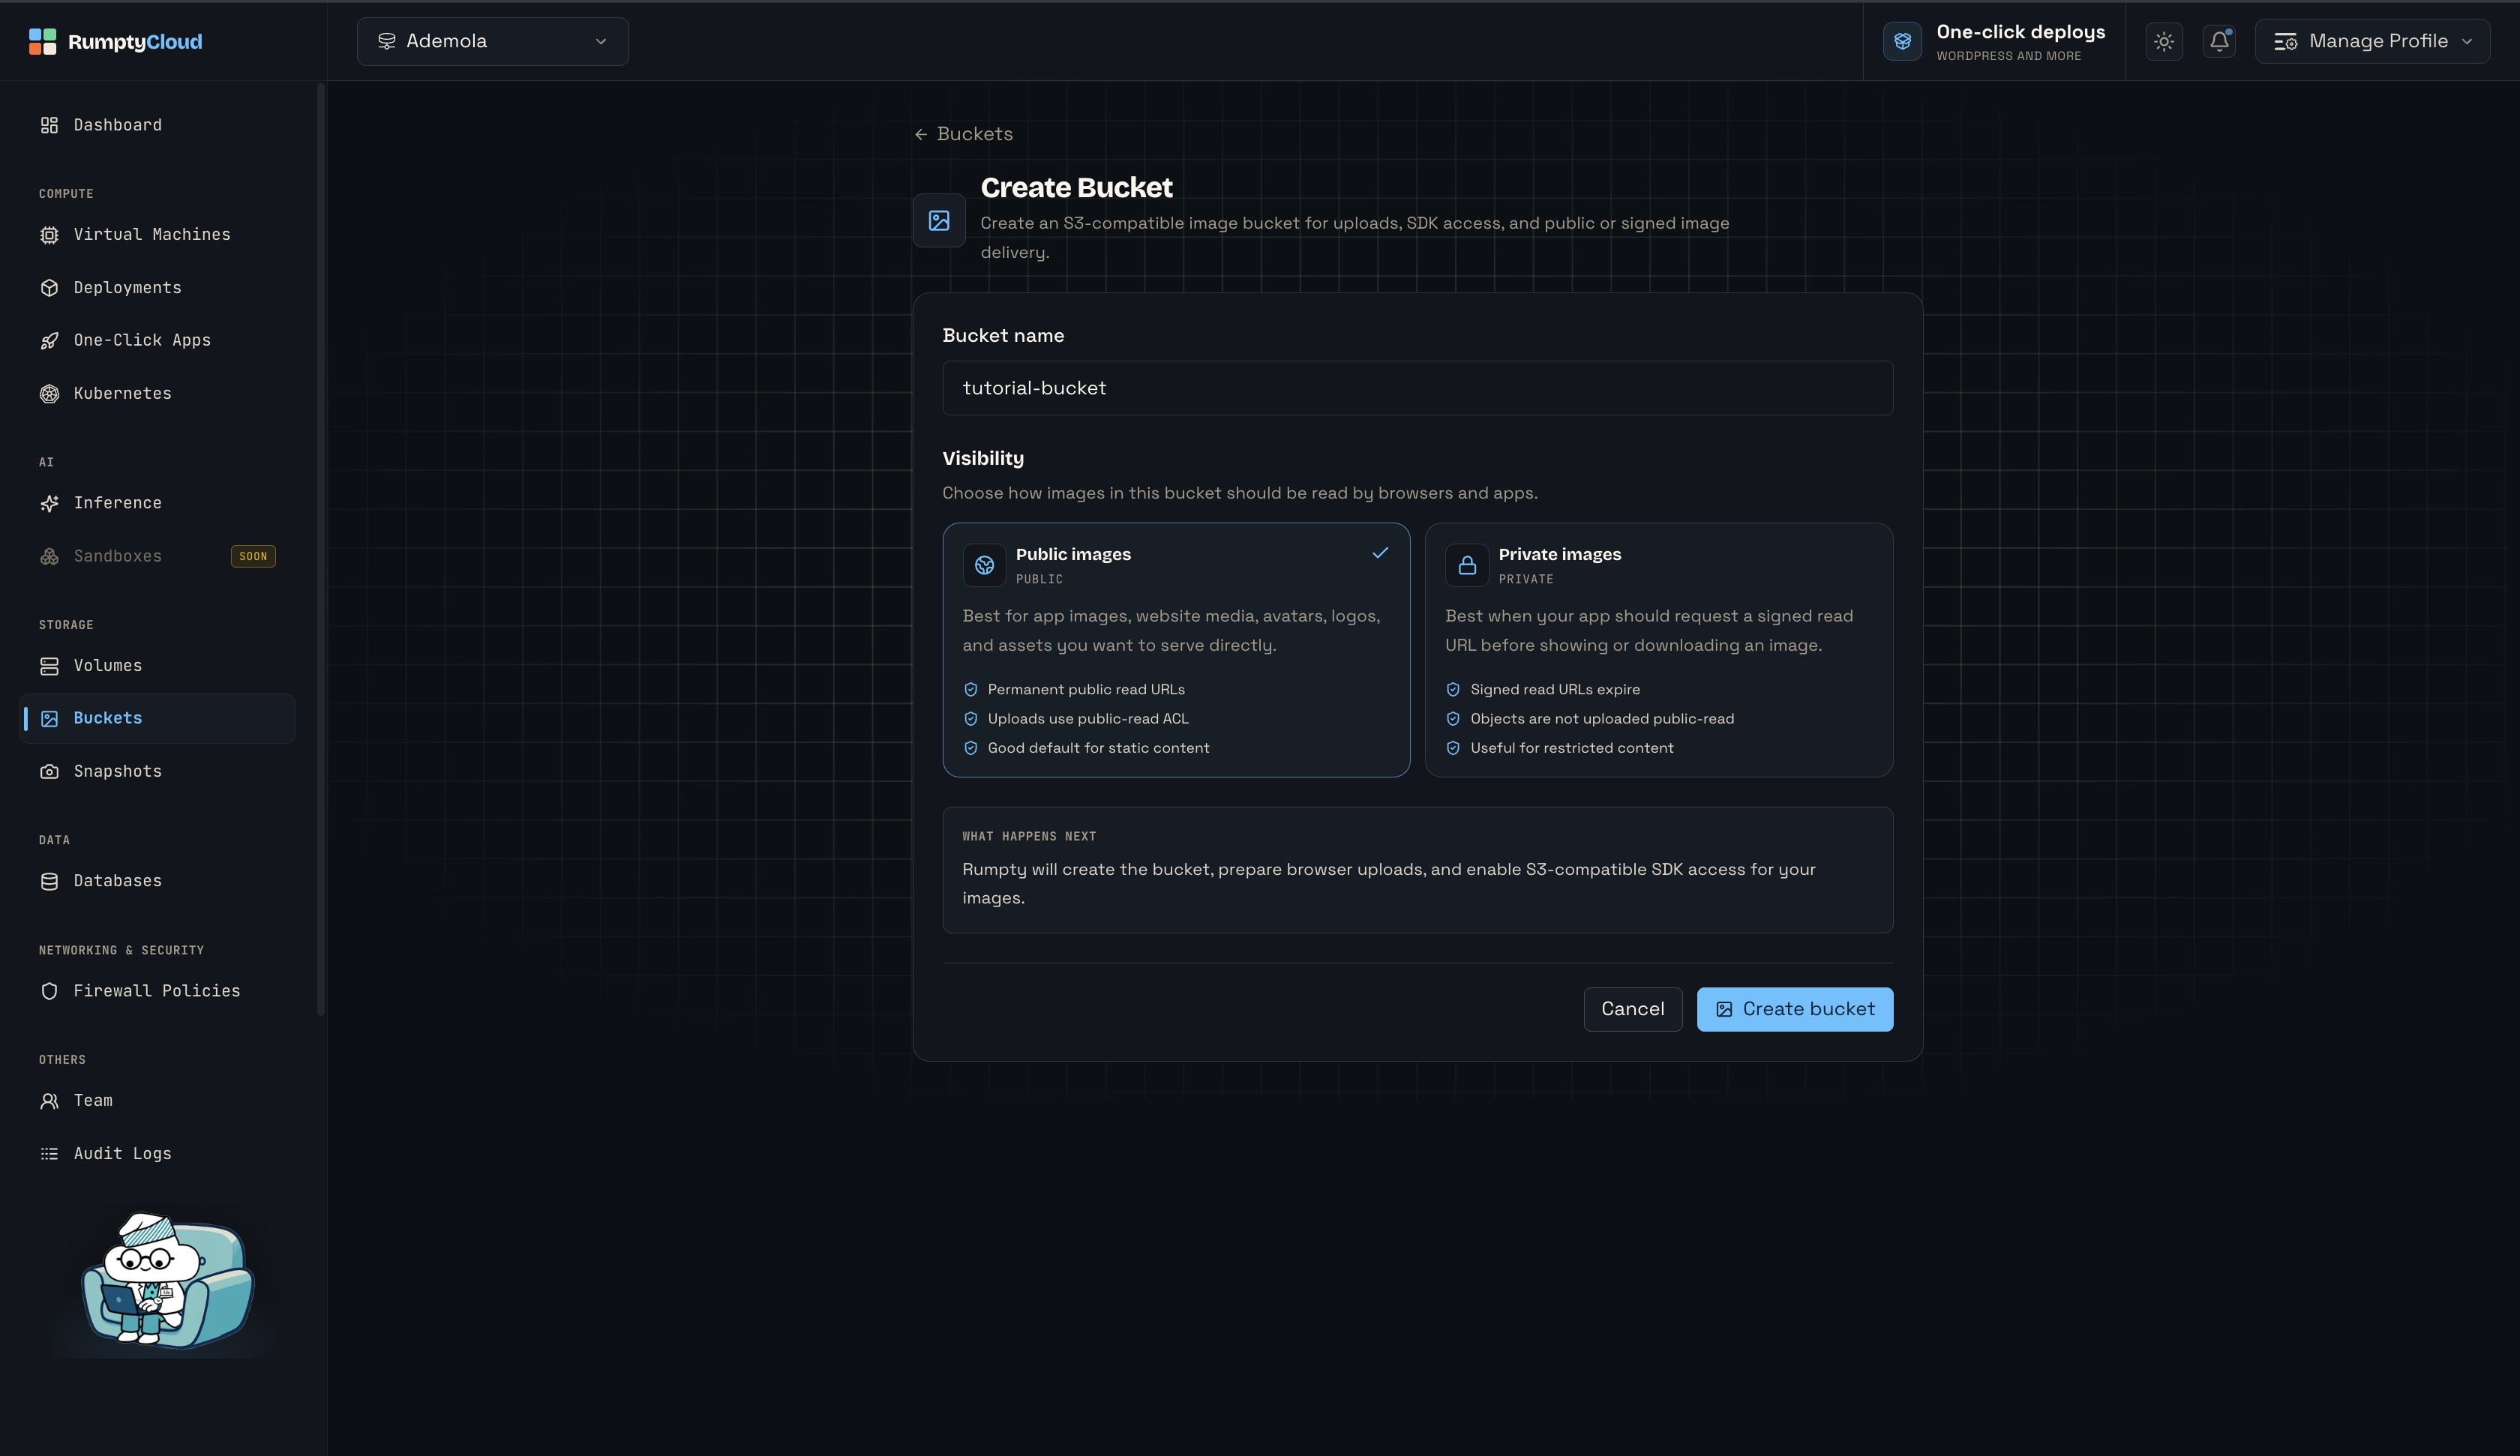
Sign in to the RumptyCloud console, select your workspace, then go to Storage → Buckets → Create bucket.
You only need two decisions: a name and whether files should be publicly readable.
-
Bucket name — unique within the workspace, for example
tutorial-bucket. Use 2 to 63 characters, starting with a letter or number. -
Visibility — how browsers and apps read files:
Option Best for Public images App images, website media, avatars, logos, and other assets you want to serve directly. Files get permanent public read URLs. Uploads use a public-read ACL. Good default for static content. Private images Restricted content. Your app should request a signed read URL before showing or downloading a file. Objects are not uploaded public-read.
Select Create bucket. RumptyCloud then prepares browser uploads and S3-compatible SDK access.
Wait until the status badge is READY. Uploads and SDK access stay locked until then.
2. Tour the bucket detail page
Once the bucket is ready, you land on its detail page. That is the home for uploads, assets, and credentials.
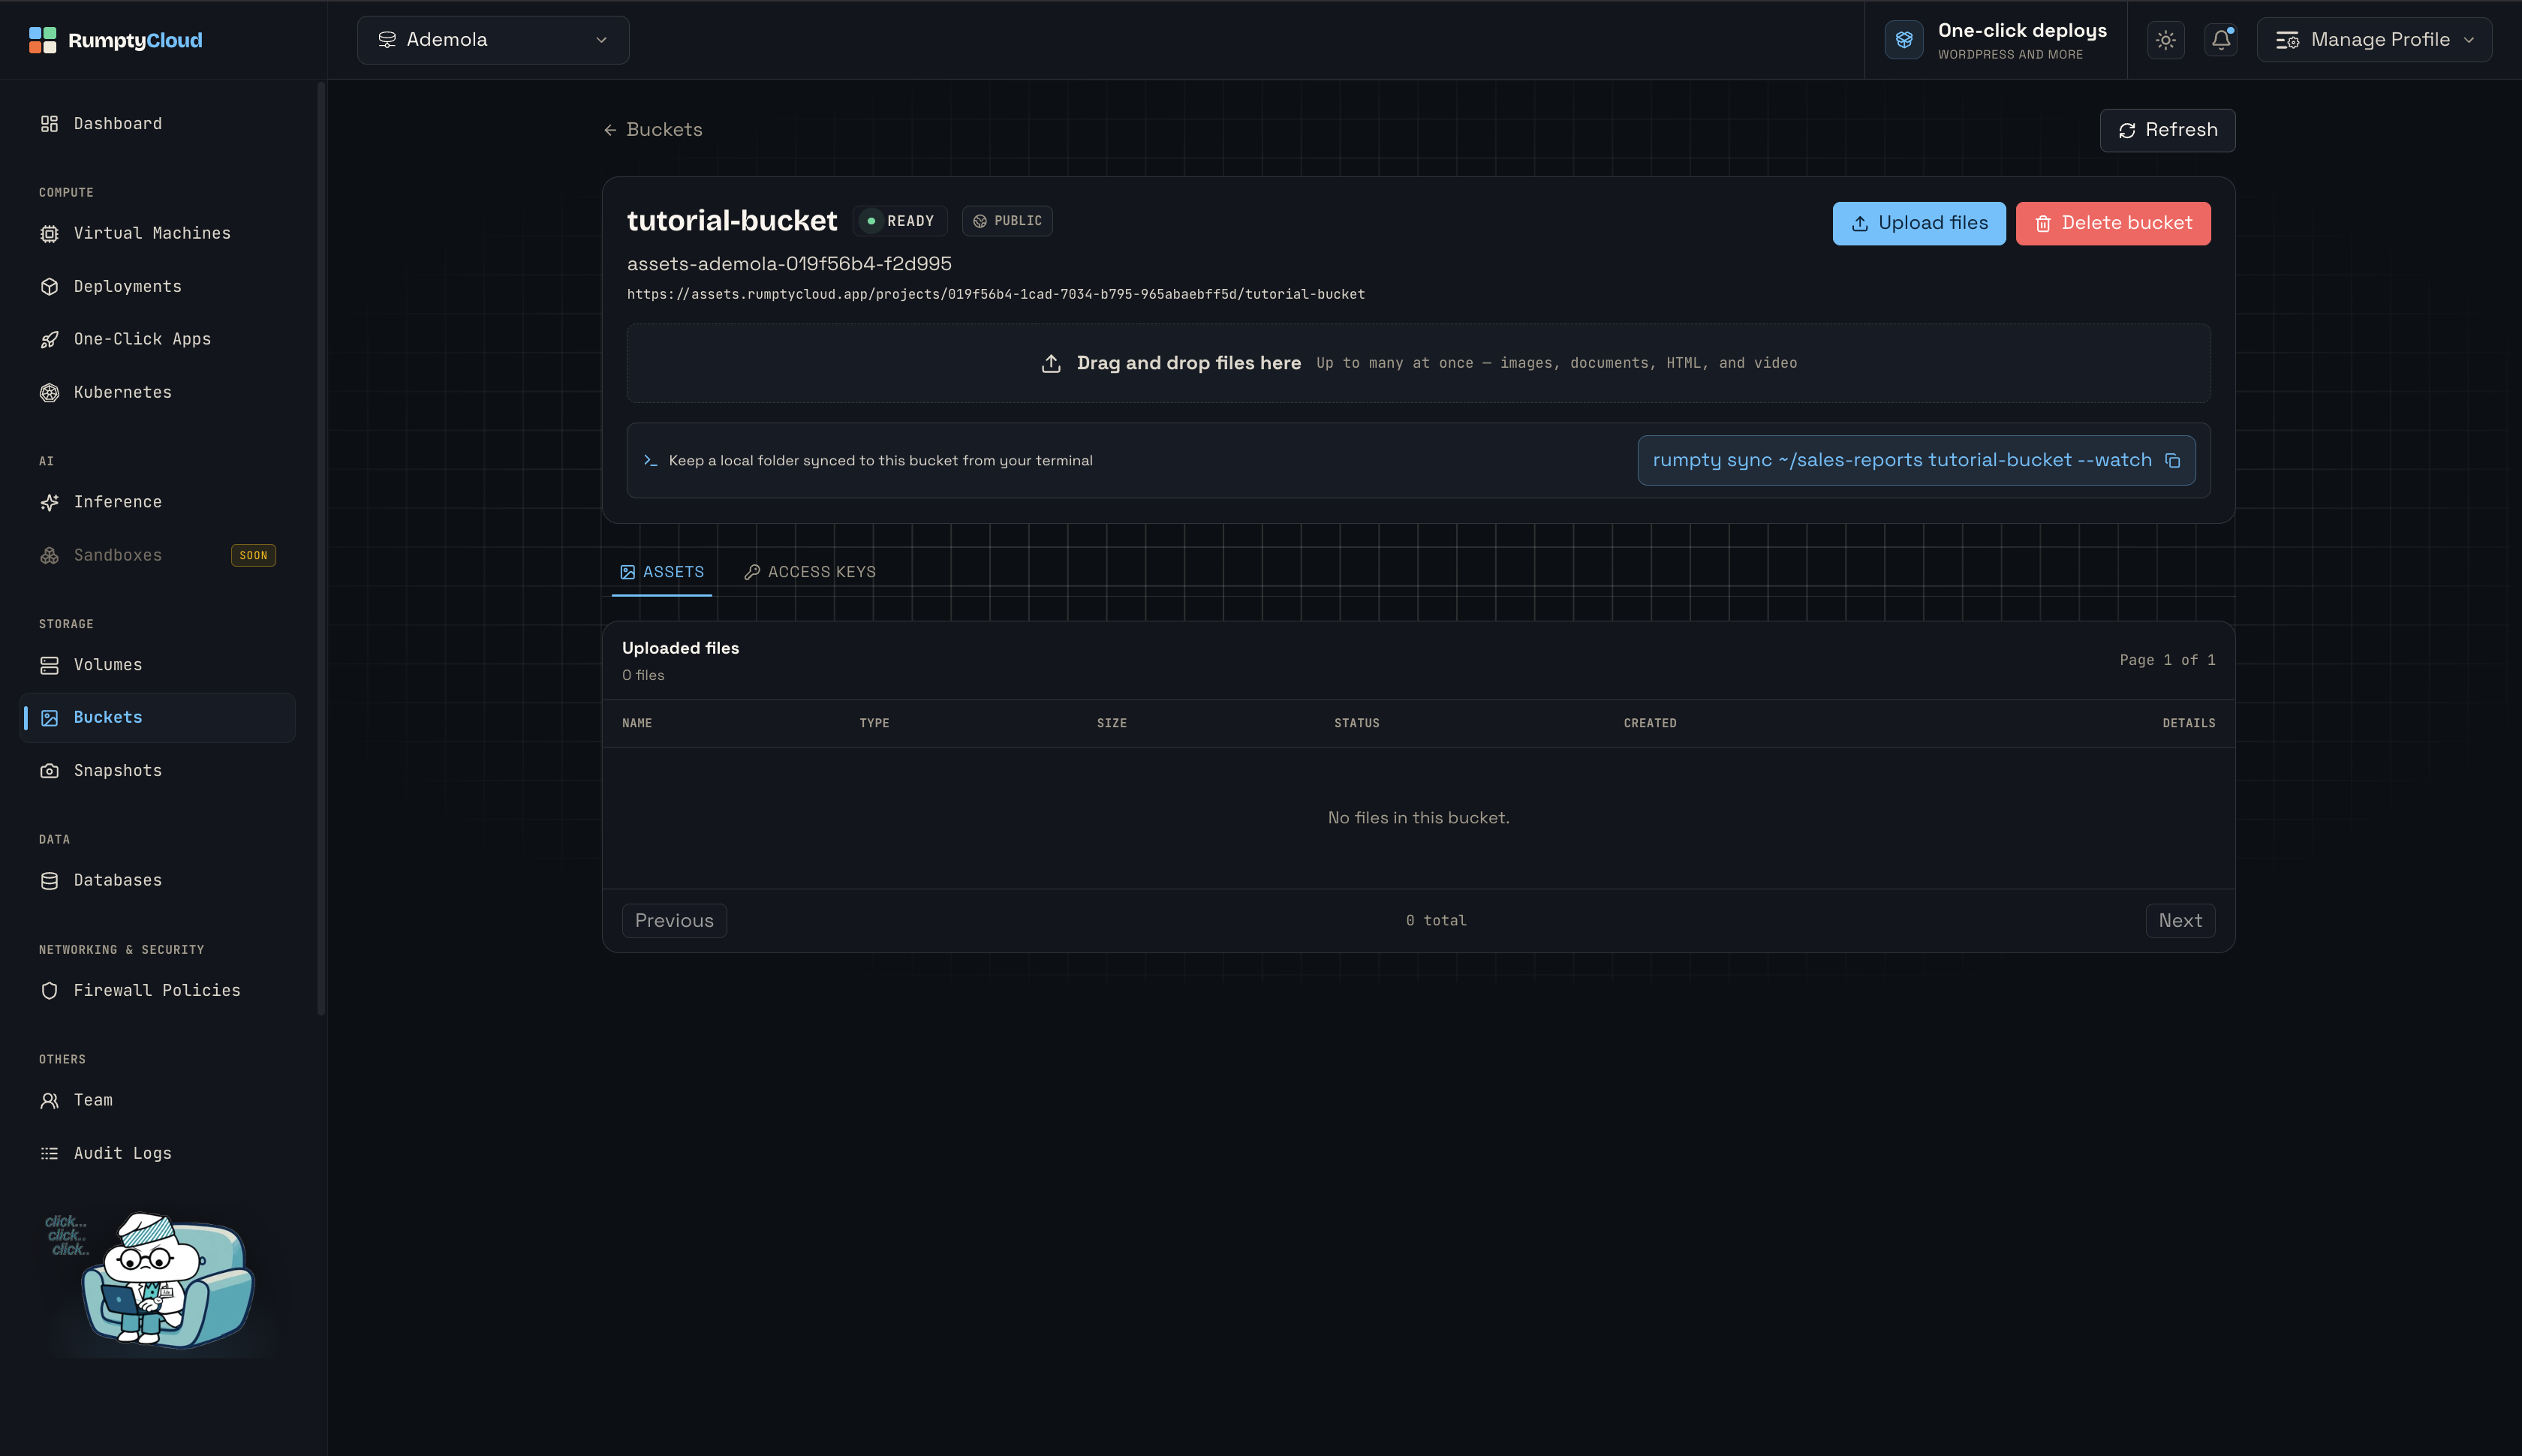
You should see:
- A status badge (
READY) and a visibility badge (PUBLICorPRIVATE) - The S3 bucket name under the title (for example
assets-ademola-019f56b4-f2d995) — this is the identifier you pass to SDKs and the AWS CLI - A public URL, in the form
https://assets.rumptycloud.app/projects/<project-id>/<bucket-name> - Upload files and Delete bucket in the header
- A drag and drop area for images, documents, HTML, and video
- A ready-made
rumpty synccommand for this bucket - An Assets tab listing uploaded files
- An Access keys tab for S3-compatible credentials
Copy the public URL from the page rather than assembling it by hand — the console shows the exact project and bucket segments for your workspace.
3. Upload files from the dashboard
From the bucket detail page, drag files into the upload area, or select Upload files and pick them from your computer.
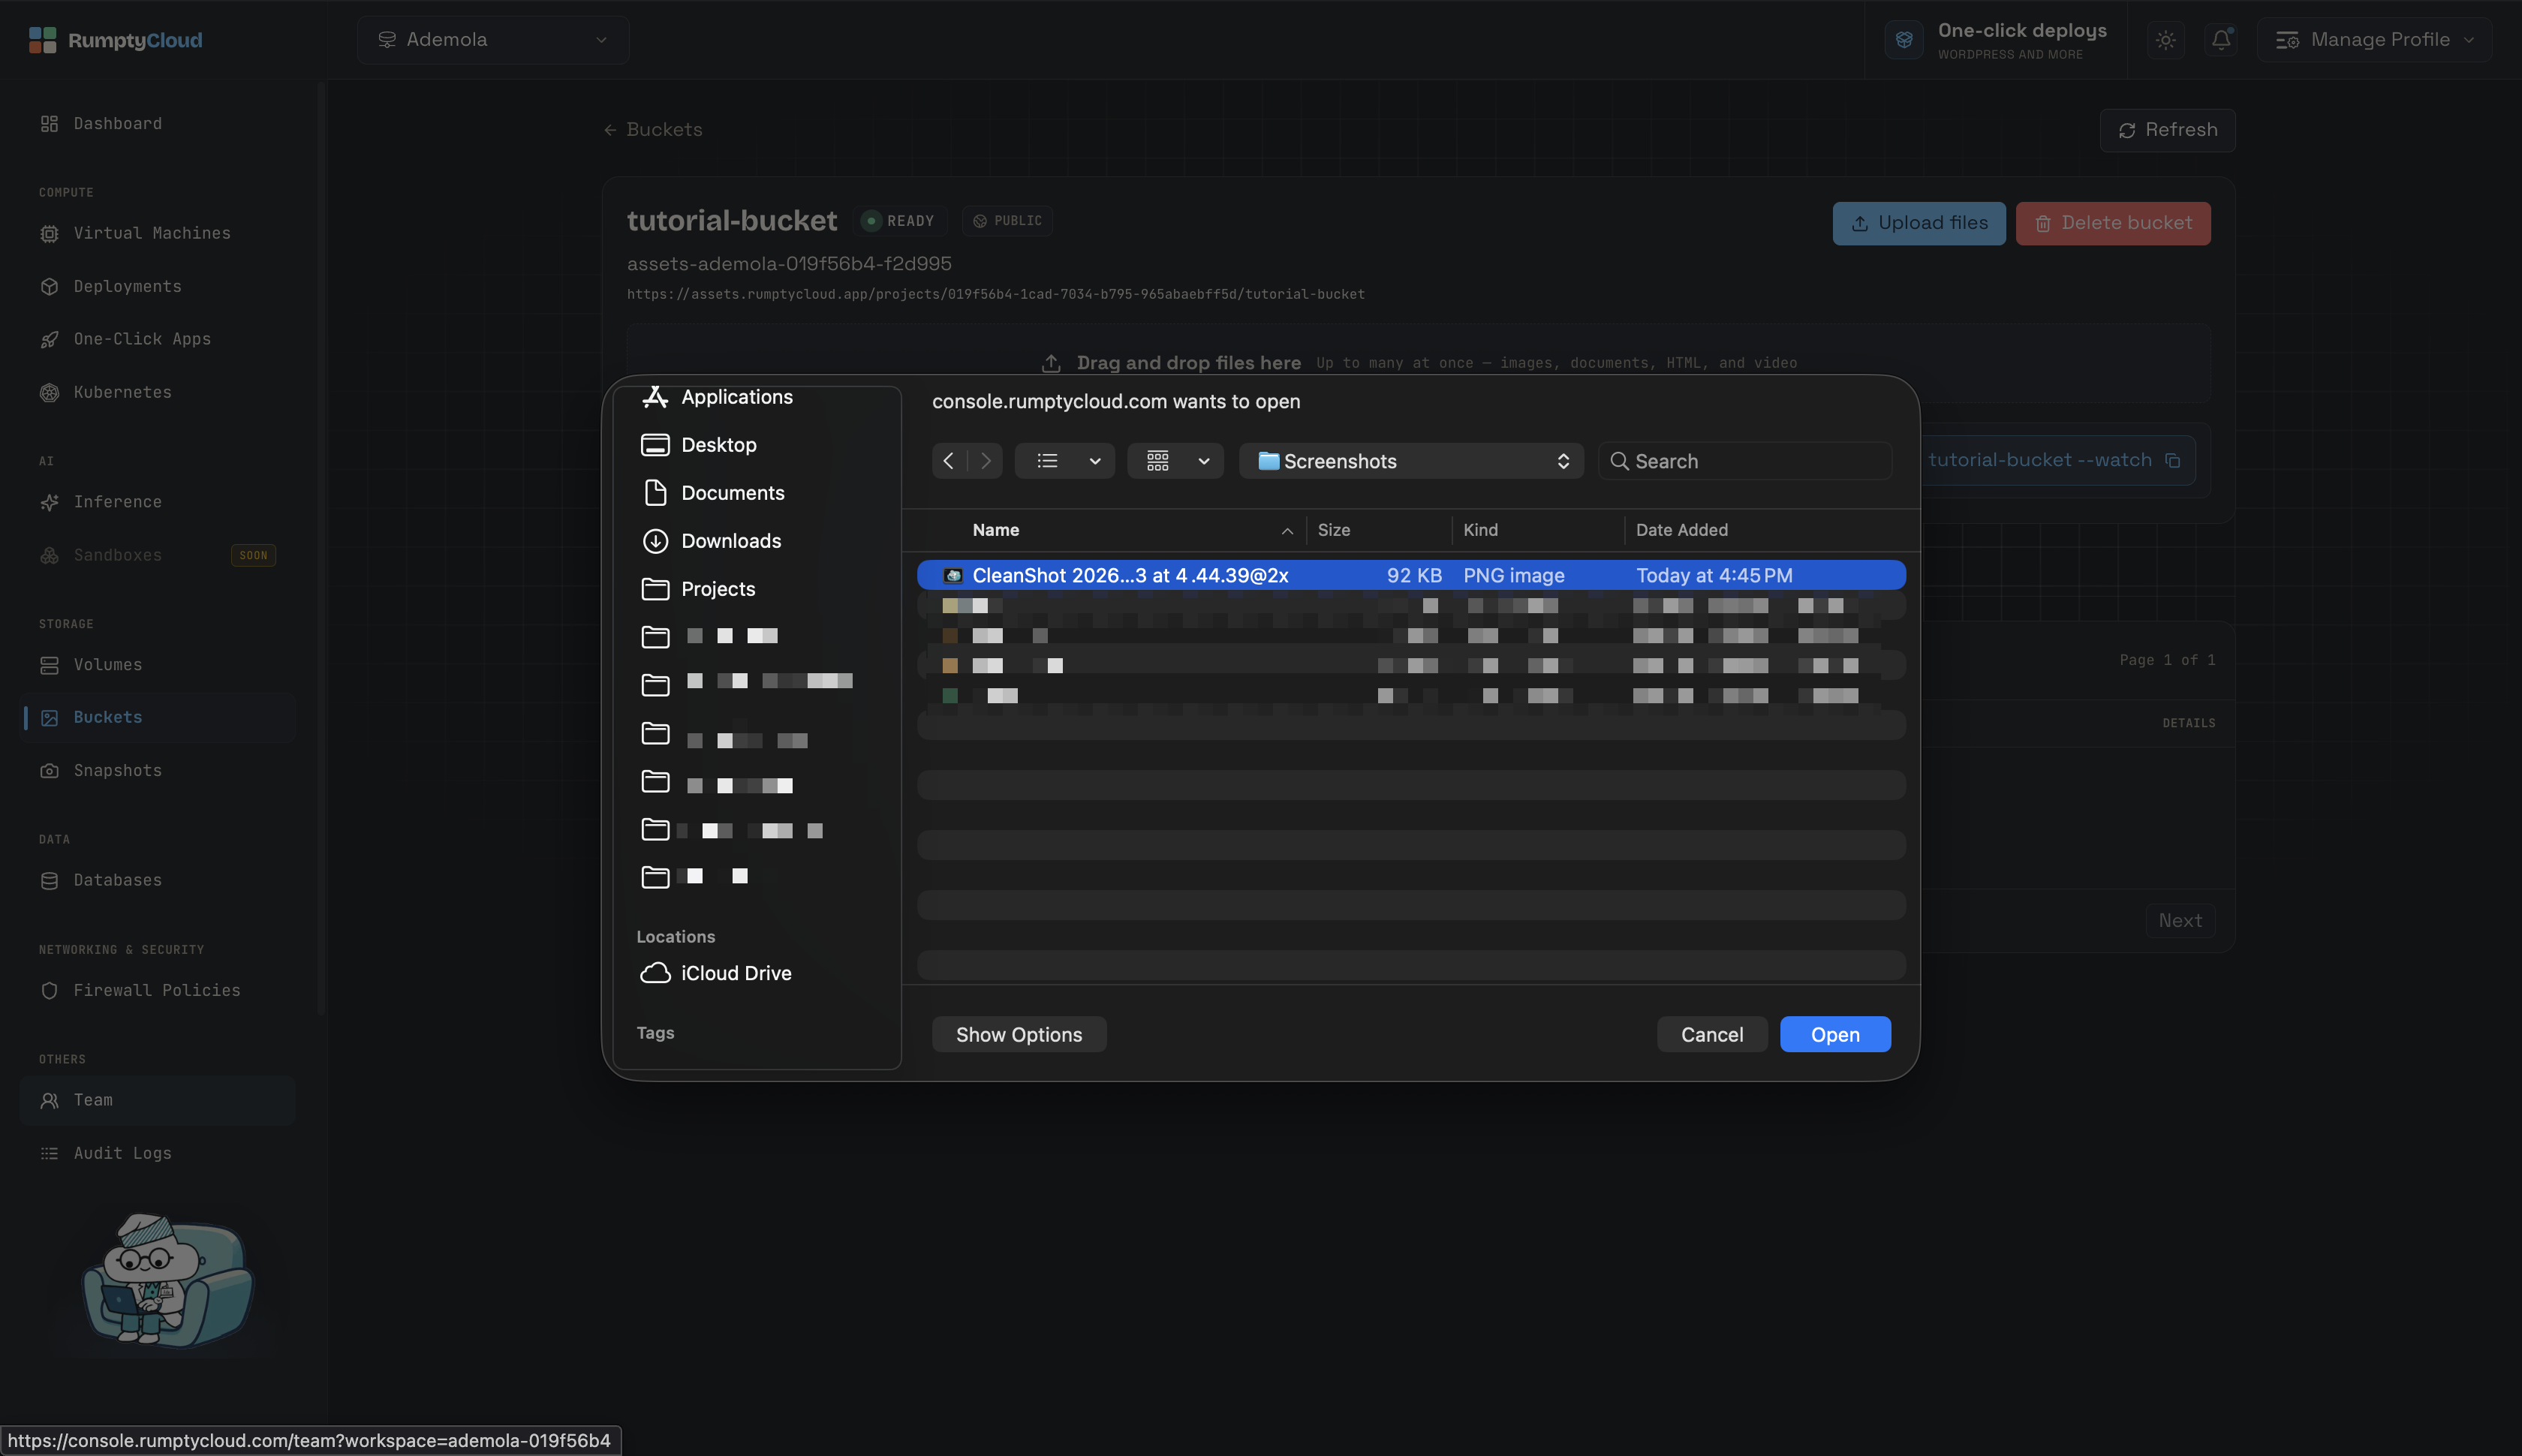
Supported types:
- Images — PNG, JPEG, WebP, GIF, SVG
- Documents — PDF, TXT, HTML, Markdown, CSV, DOCX
- Video — MP4, WebM, MOV, MKV, AVI, plus HLS playlists and segments
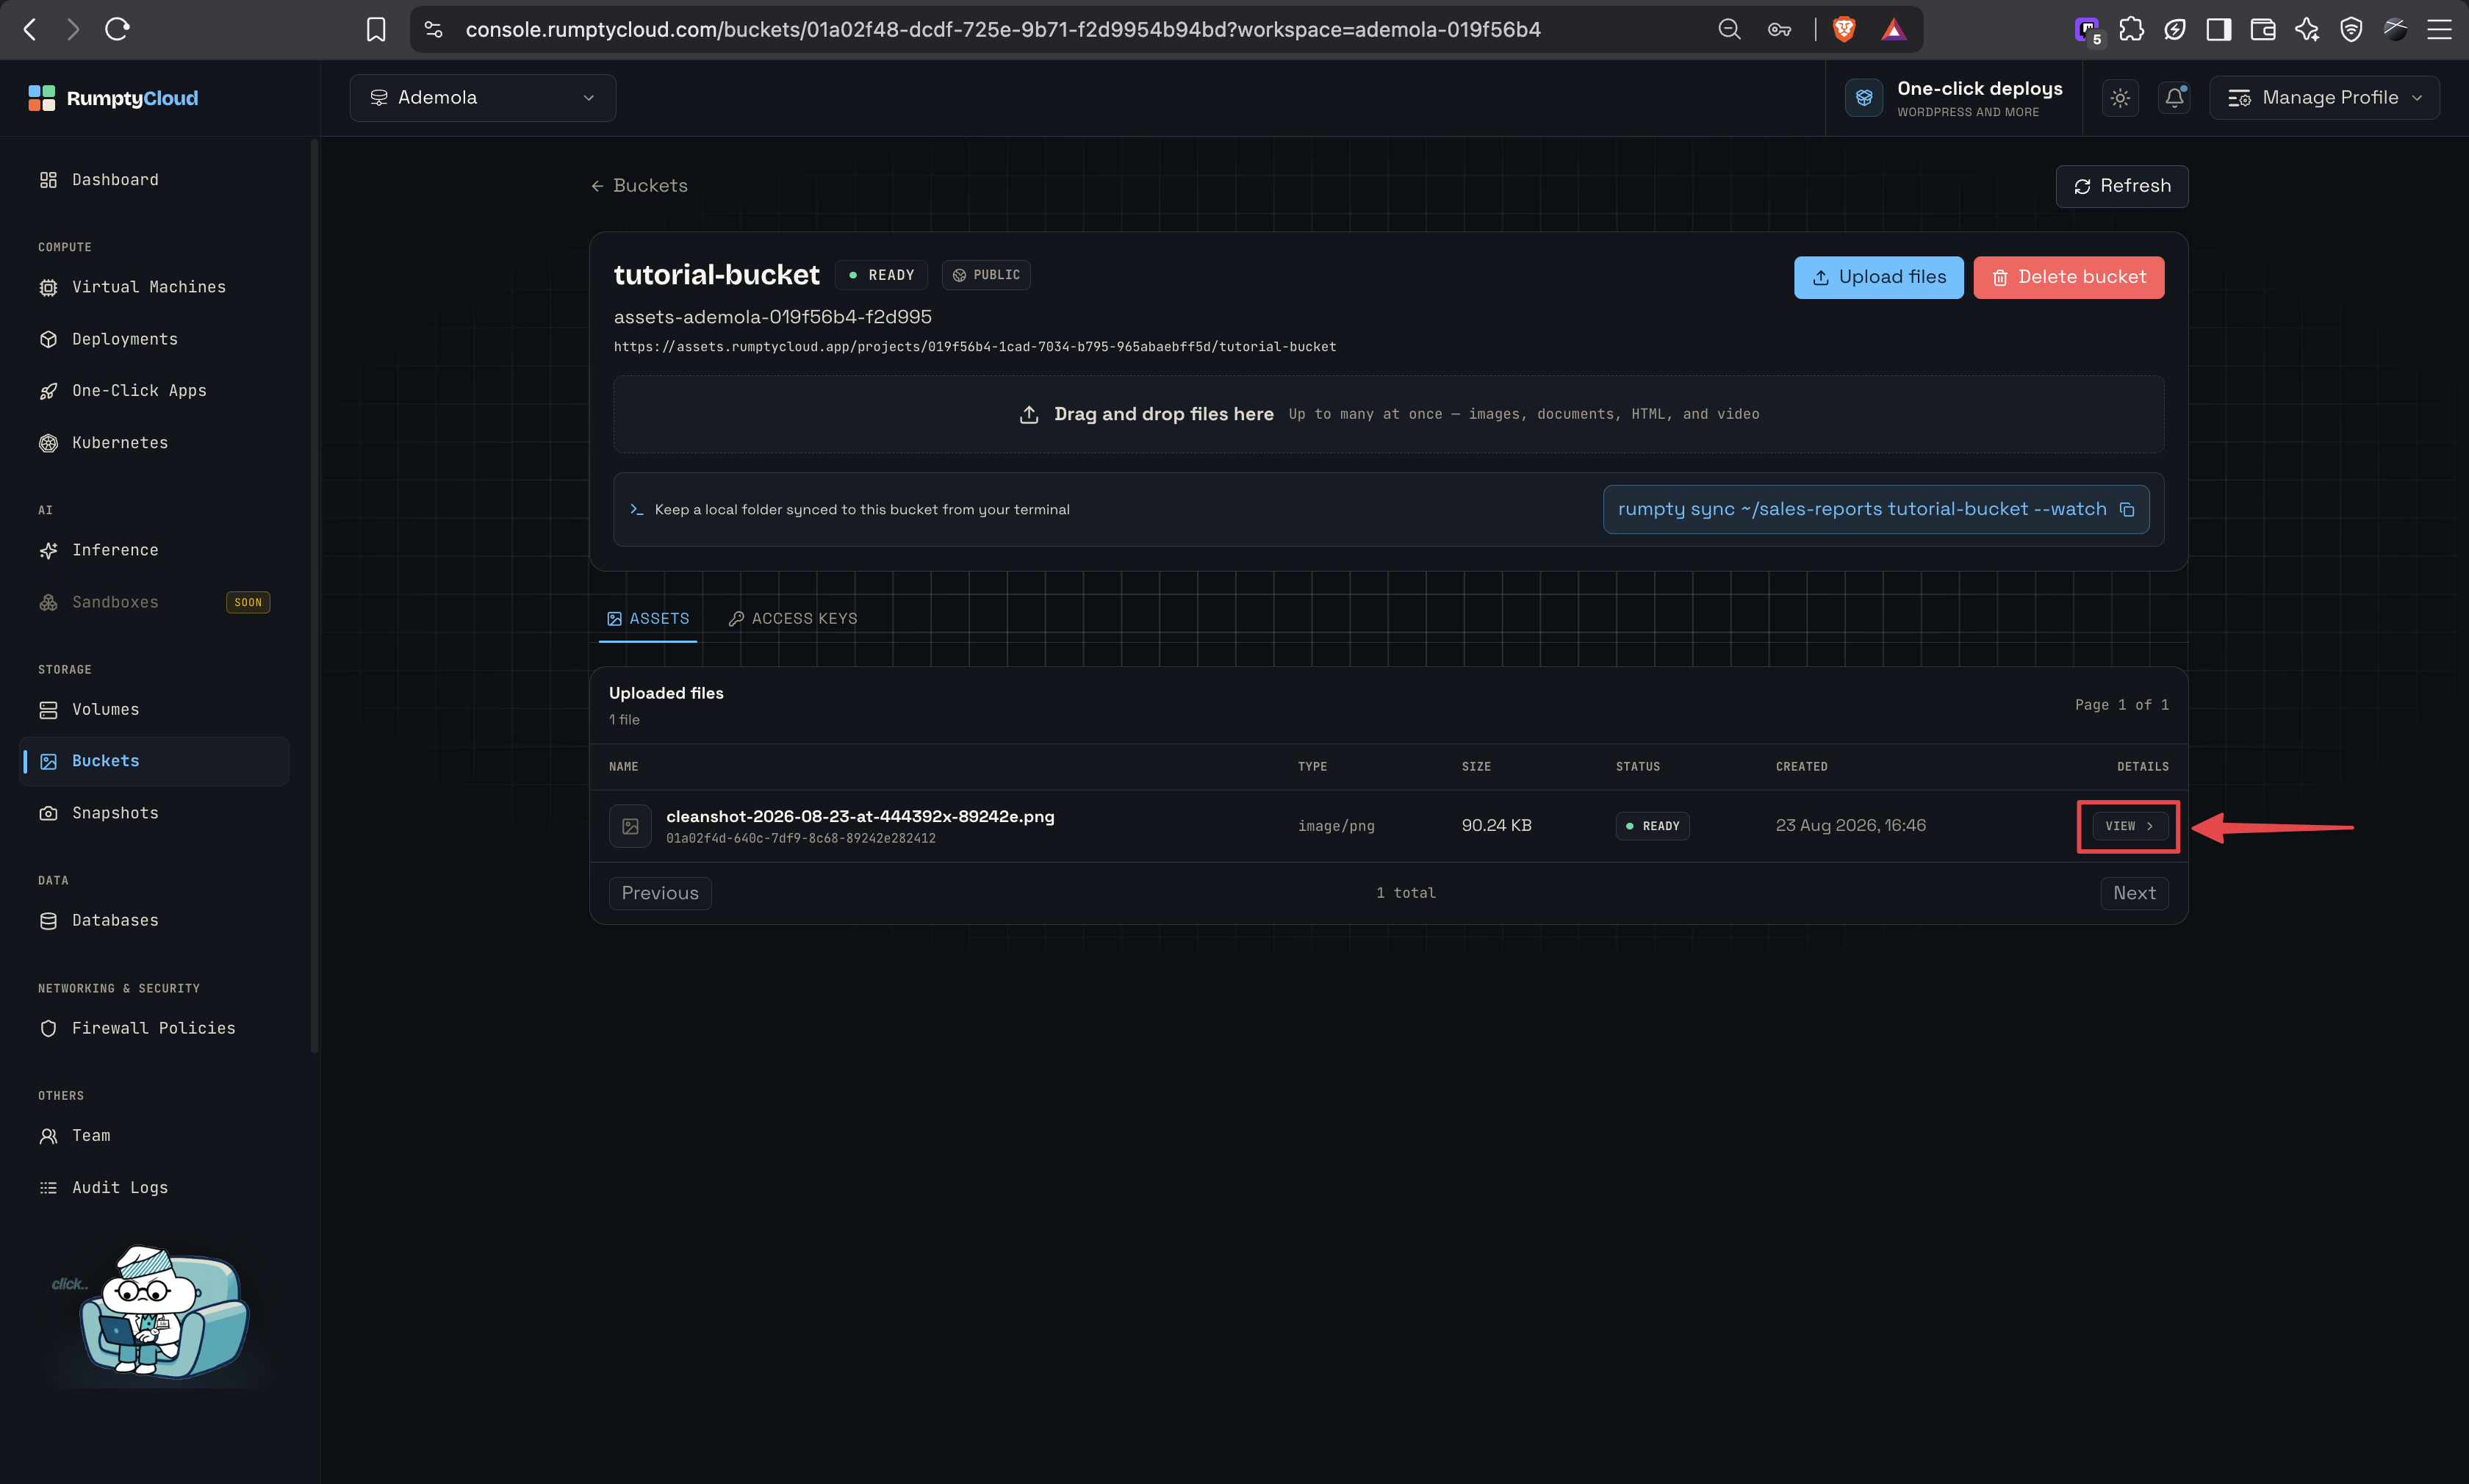
Uploaded files appear in the Assets tab with name, type, size, status, and creation date. When a file is READY, select VIEW to open its details.
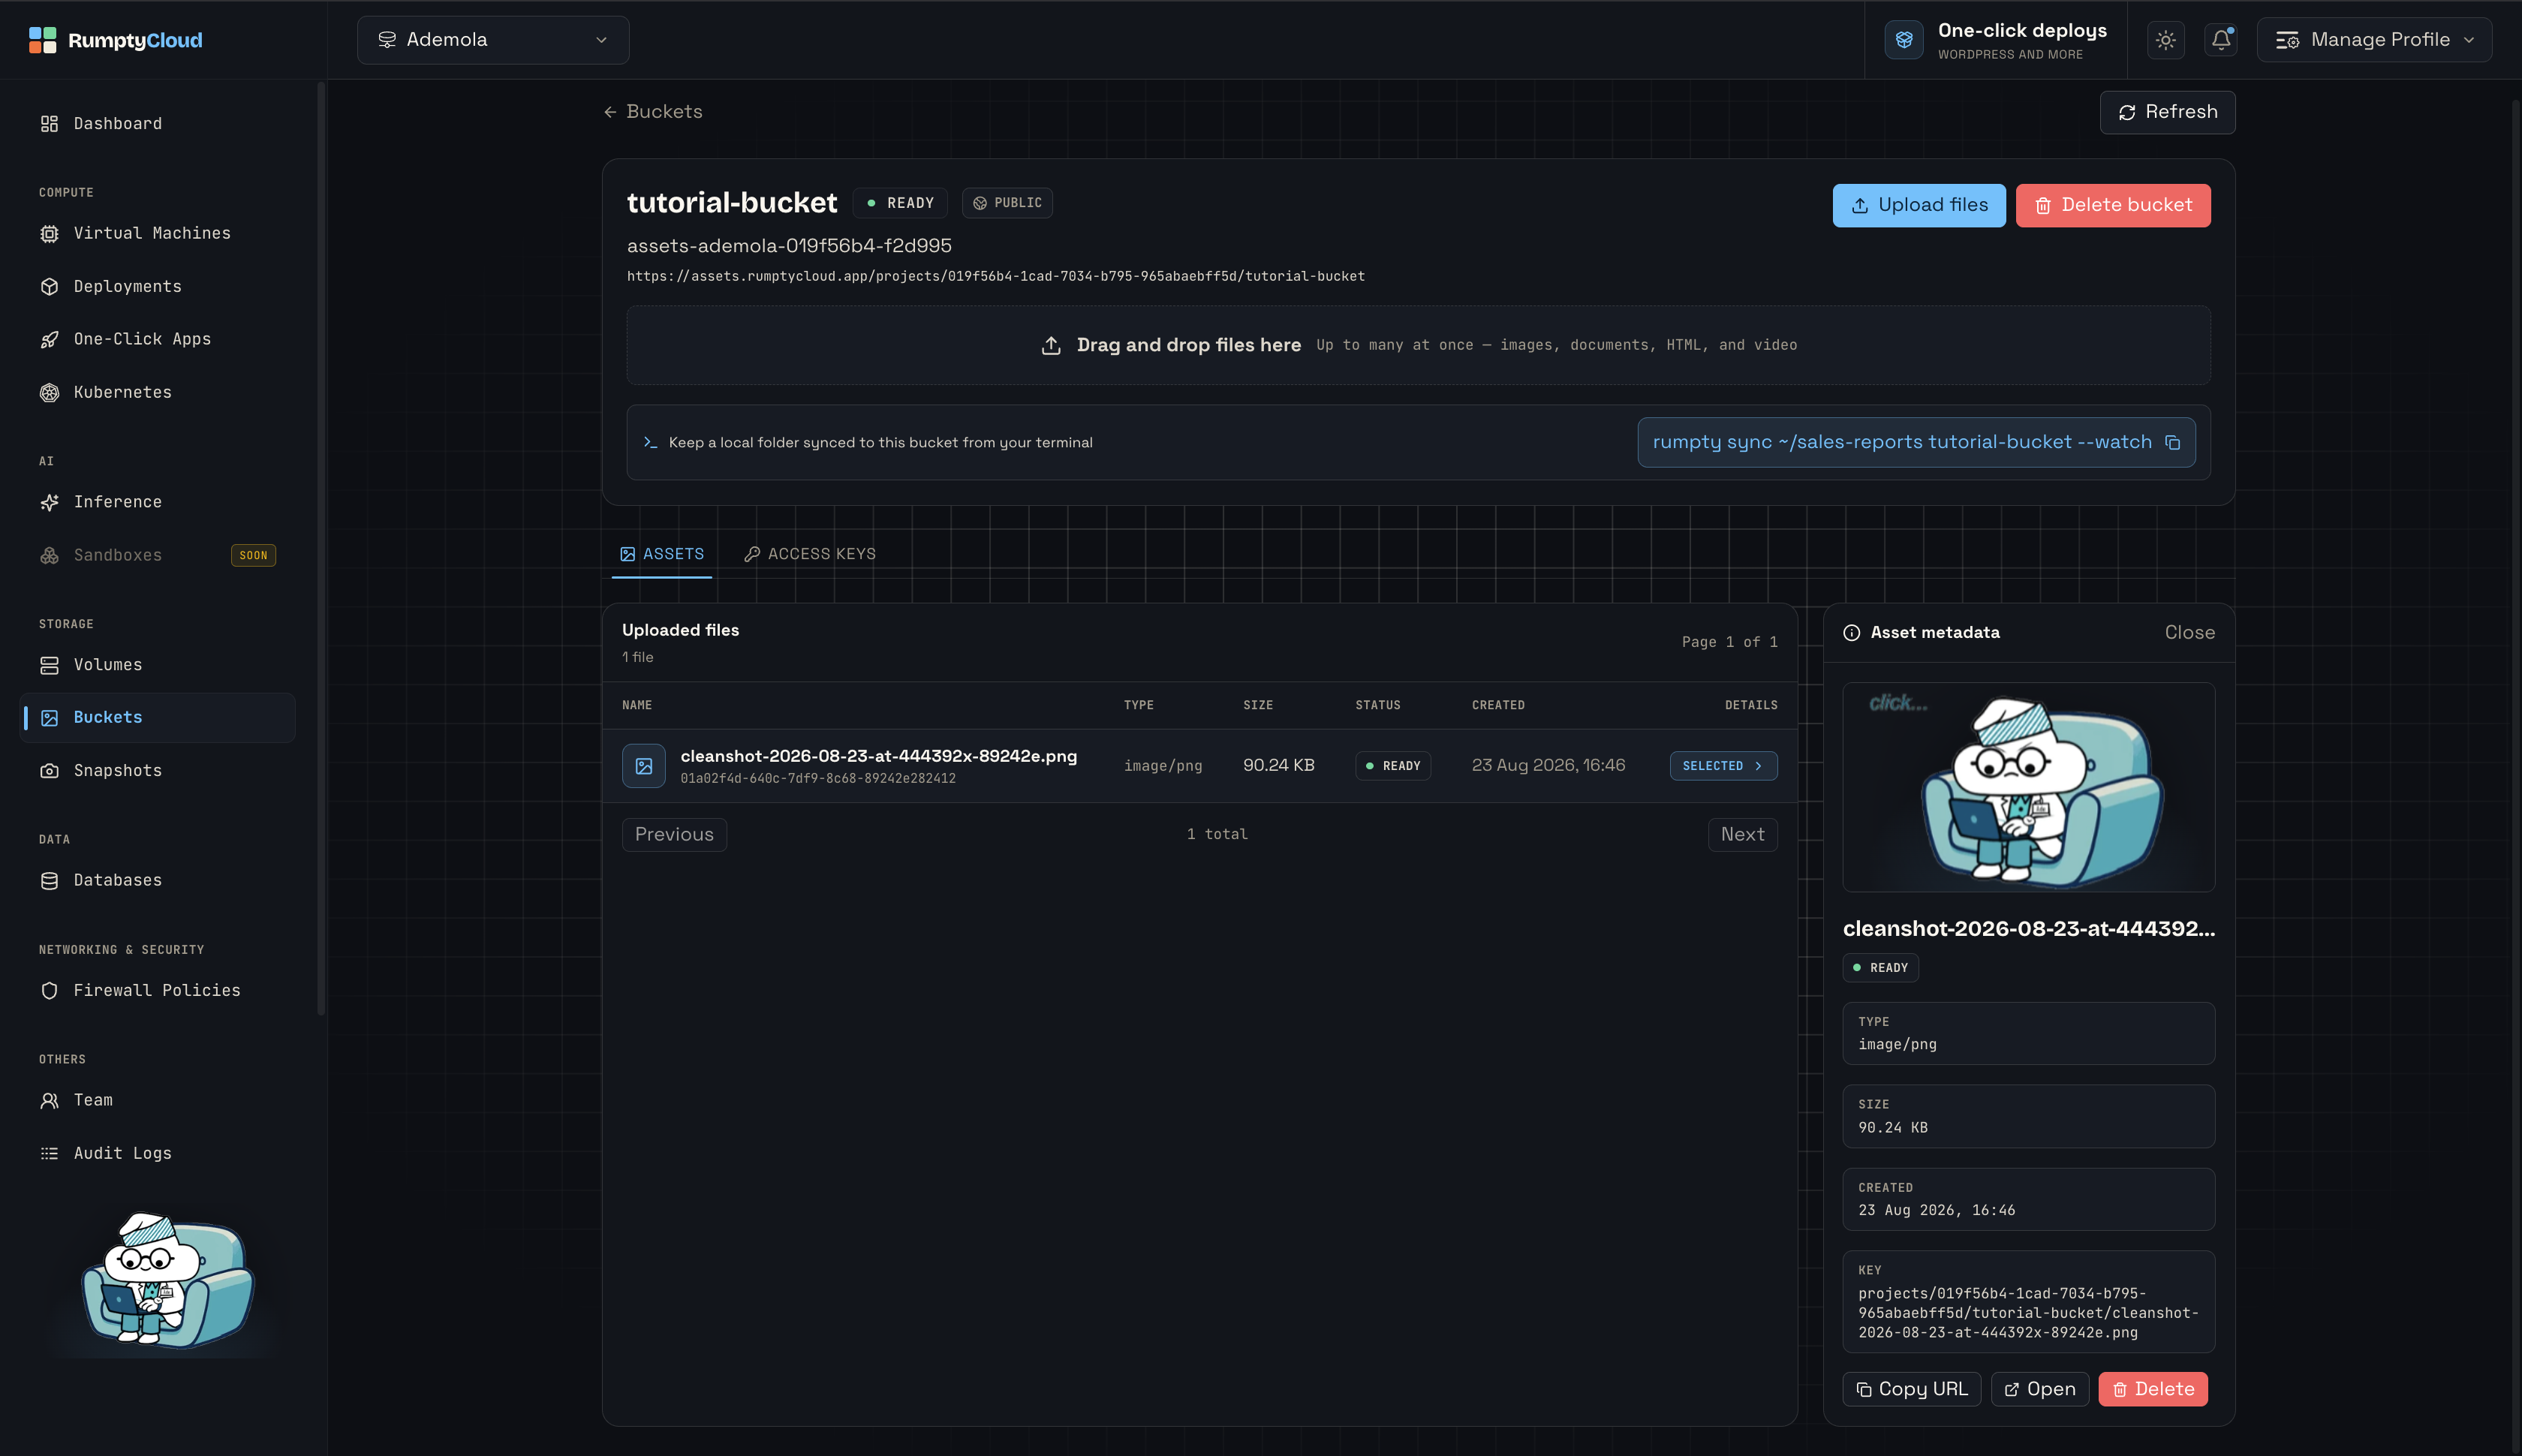
The Asset metadata panel shows a preview, type, size, created date, and the object key. From here you can Copy URL, Open the file in a new tab, or Delete it.
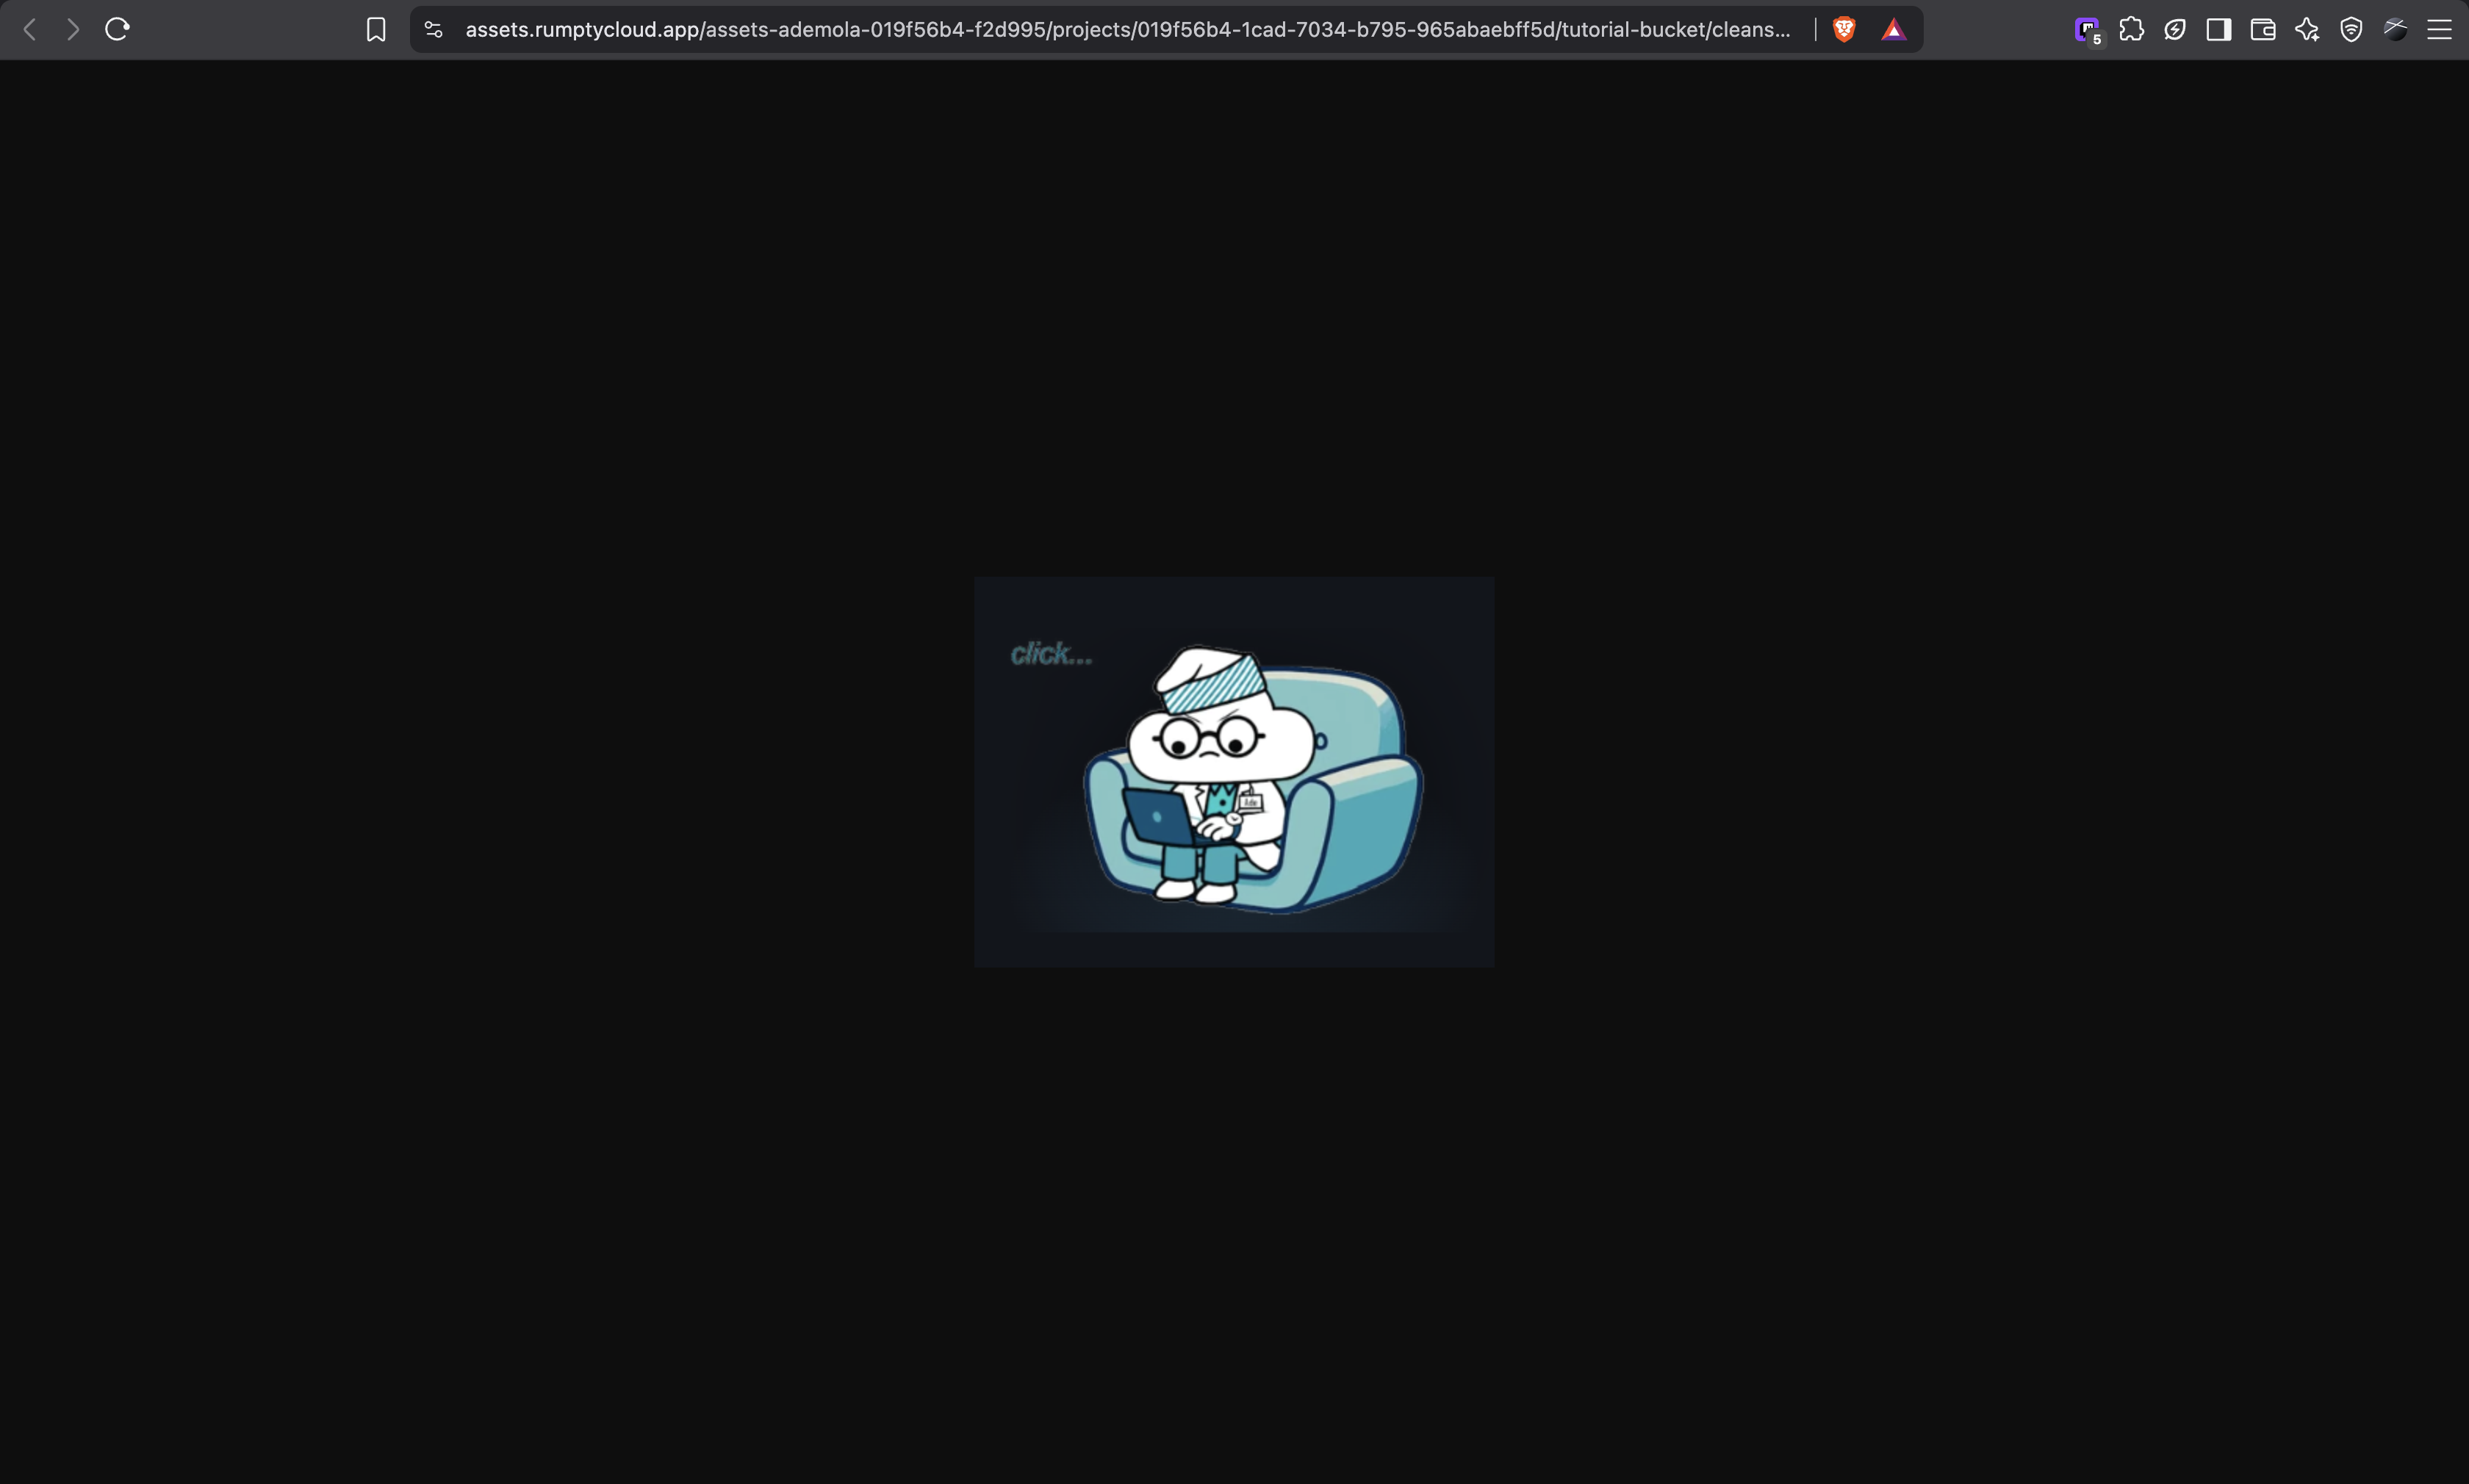
Public buckets: permanent URLs
Public buckets serve each file at a permanent CDN URL:
https://assets.rumptycloud.app/projects/<project-id>/<bucket-name>/<file-key>The fastest path is VIEW → Copy URL (or Open). Paste that URL in <img> tags, CSS, or any app that needs a stable address.
Private buckets: signed URLs
Private objects are never directly public-read. The dashboard generates a signed read URL when you open a file for preview, and the inspector shows when that URL expires. For production, generate signed URLs on your server with an S3 SDK (see Access keys below) and only then send the URL to the client.
4. Sync a local folder with the Rumpty CLI
The detail page already prints a sync command for the bucket you are looking at, for example:
rumpty sync ~/sales-reports tutorial-bucket --watchrumpty sync is one-way (local to cloud) and incremental: only new and changed files upload on later runs.
Install and sign in if you have not already:
curl -fsSL https://get.rumptycloud.com | sh
rumpty --version
rumpty login
On the first run the CLI signs you in if needed, creates the bucket if it does not exist (private by default), mints and caches an access key, and uploads your files. If you omit the bucket name, the CLI uses the folder name:
cd ~/sales-reports
rumpty sync .
Useful flags:
| Flag | What it does |
|---|---|
--public |
Create the bucket with publicly readable files (default is private) |
--watch |
Keep running and upload changes as they happen |
--daemon |
Same as --watch, but detached in the background |
--restore |
Copy files from the bucket back to the local folder |
--delete |
Delete remote files that no longer exist locally |
--dry-run |
Show what would transfer without doing it |
--include |
Only sync matching globs |
--exclude |
Skip matching globs |
Preview a destructive sync before you run it:
rumpty sync ~/photos my-backups --delete --dry-runRestore onto another machine:
rumpty sync ~/restored-photos my-backups --restoreKeys created by
syncare cached in the CLI config directory. If you revoke a key in the console, the CLI mints a new one and retries. Revoke keys from the bucket’s Access keys tab.
Full reference: Sync a Local Folder.
5. Create access keys and upload with an SDK
For apps and CI, use S3-compatible credentials.
- Open the bucket detail page → Access keys.
- Enter a name (for example
tutorial-bucket-keys) and select Create. - Copy the secret access key immediately — it is shown only once under SECRET SHOWN ONCE.
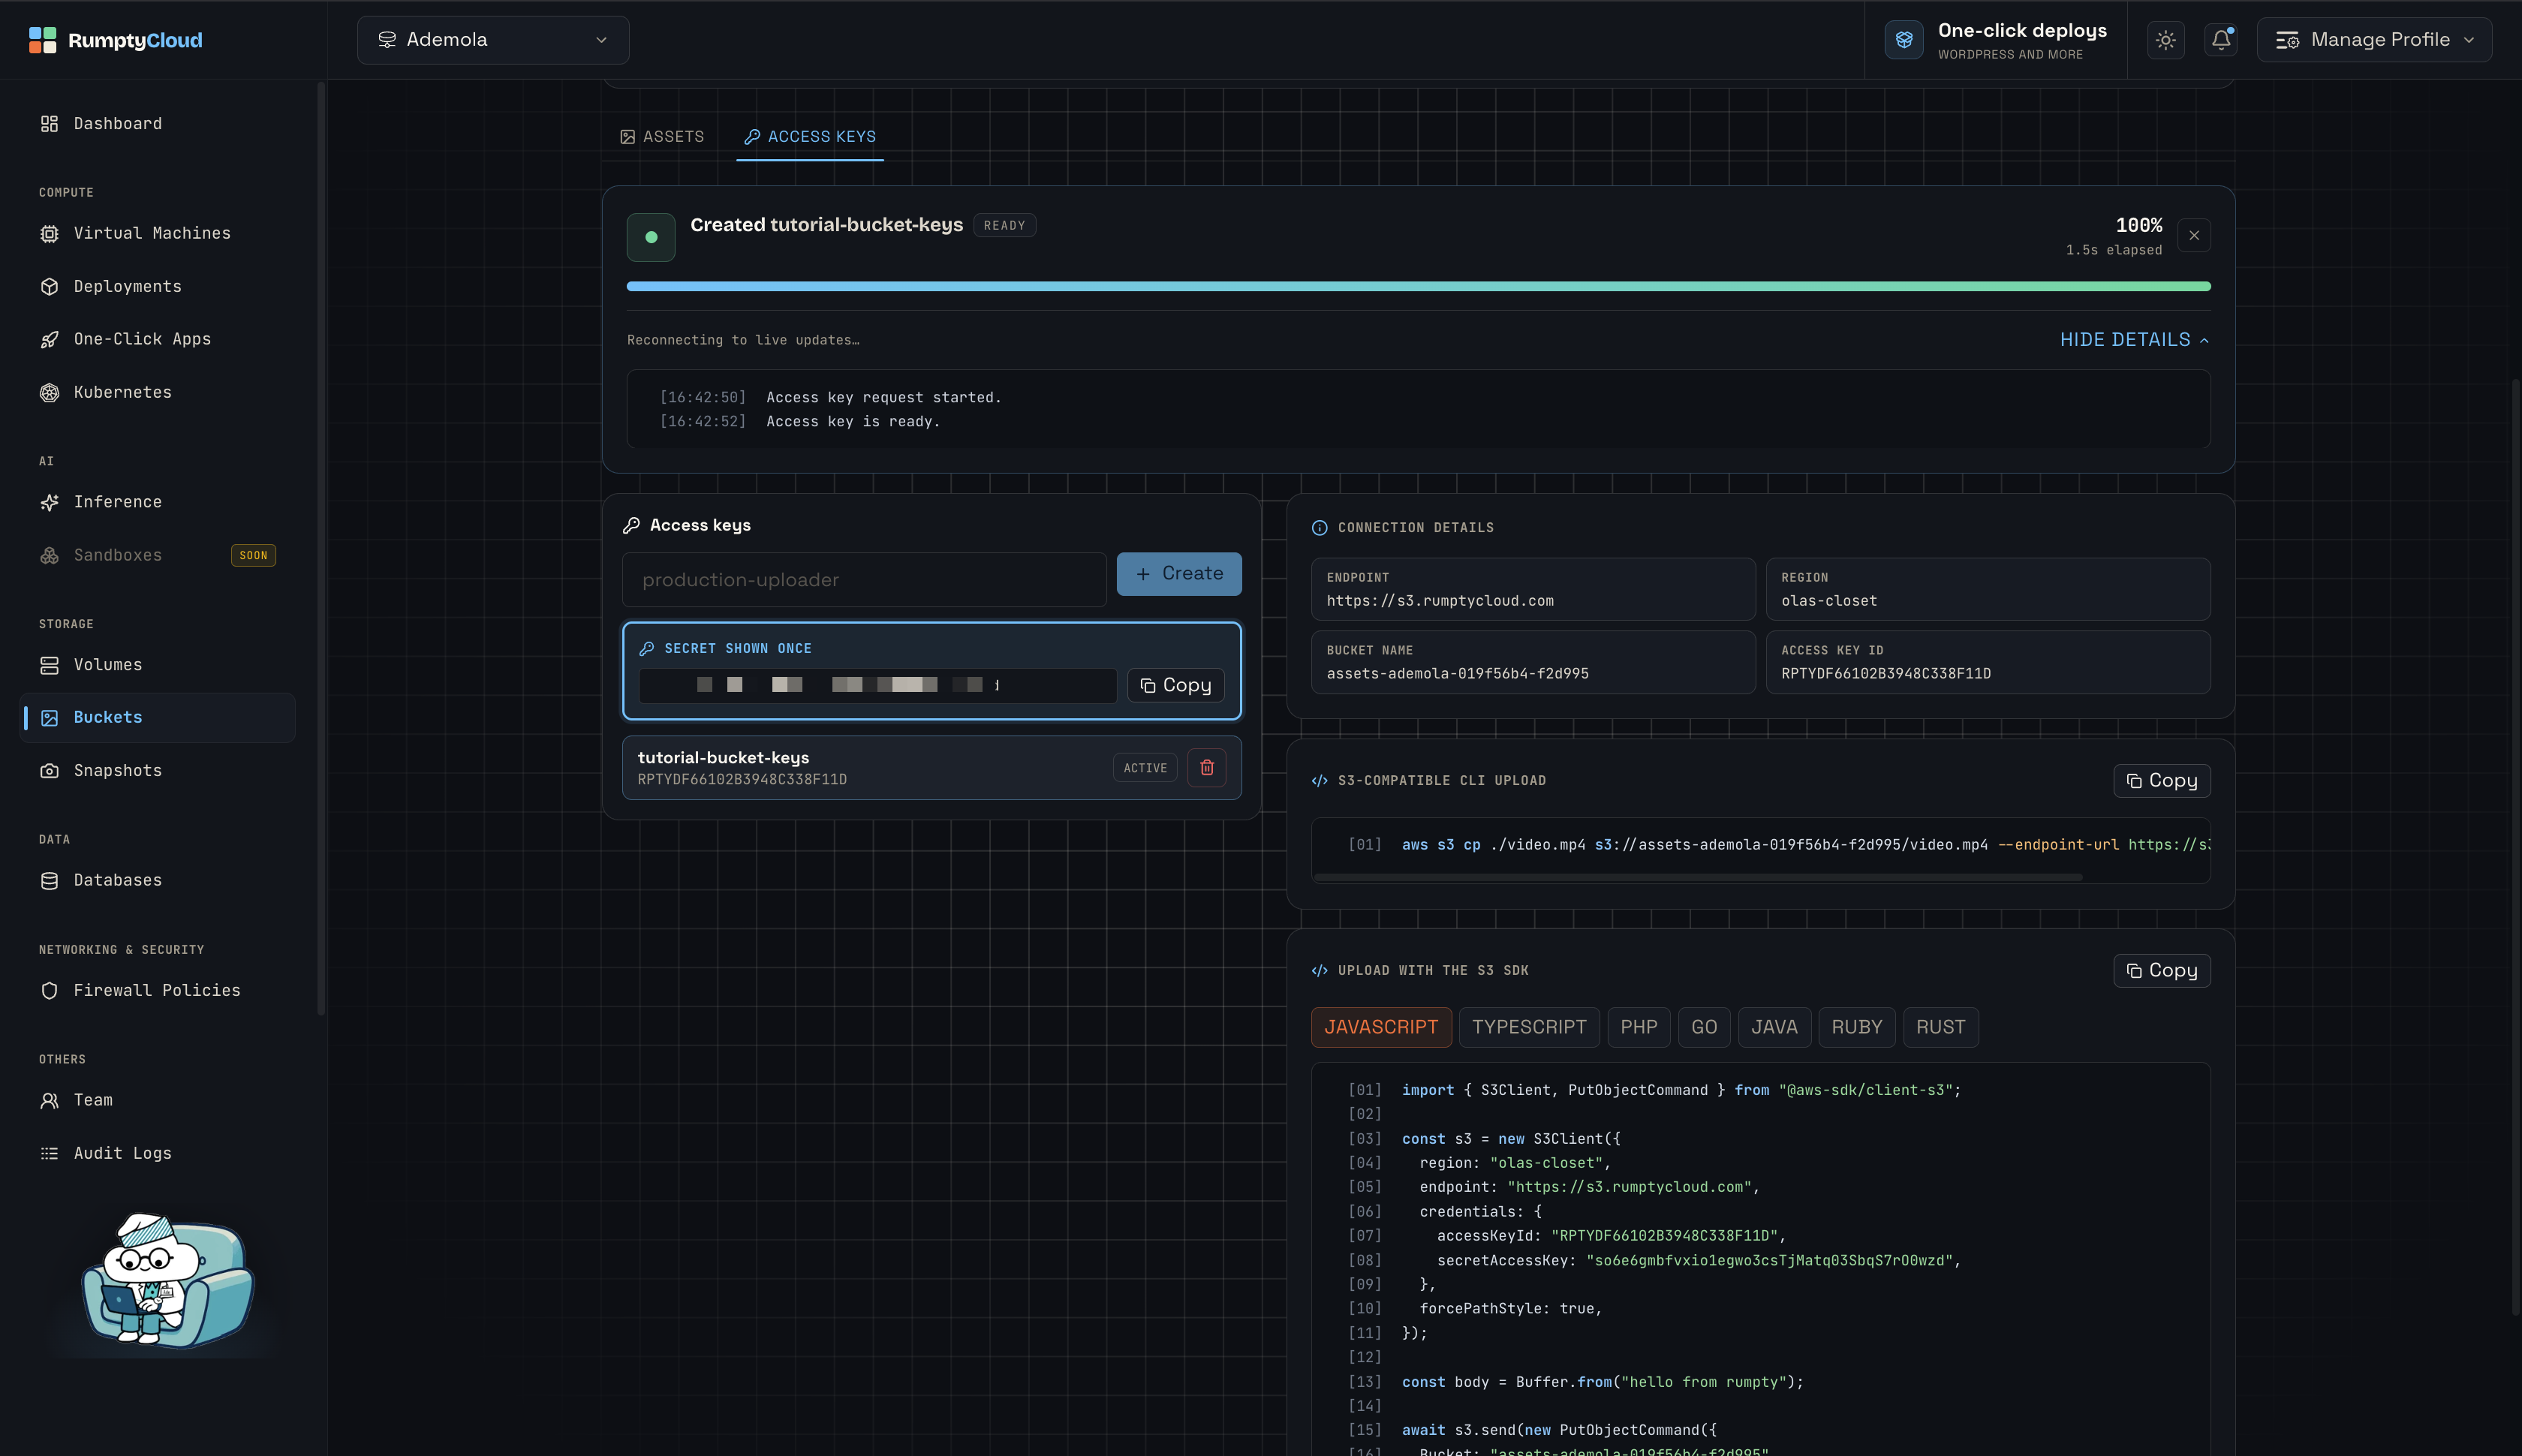
The same tab shows Connection details for this bucket:
| Field | Example |
|---|---|
| Endpoint | https://s3.rumptycloud.com |
| Region | elas-closet |
| Bucket name | assets-ademola-019f56b4-f2d995 (the S3 name, not only the display name) |
| Access key ID | shown after you create a key |
It also includes copy-paste upload snippets for JavaScript, TypeScript, PHP, Go, Java, Ruby, and Rust. Prefer those snippets when they are present — they are generated for this bucket.
Use any S3 SDK or the AWS CLI against https://s3.rumptycloud.com. Enable path-style addressing (forcePathStyle: true).
AWS CLI
export AWS_ACCESS_KEY_ID=<your-key>
export AWS_SECRET_ACCESS_KEY=<your-secret>

aws s3 cp ./photo.jpg s3://<s3-bucket-name>/photo.jpg \
  --endpoint-url https://s3.rumptycloud.com
JavaScript (AWS SDK v3)
import { PutObjectCommand, S3Client } from "@aws-sdk/client-s3";
import { readFile } from "node:fs/promises";

const s3 = new S3Client({
  region: process.env.RUMPTY_REGION, // e.g. elas-closet
  endpoint: "https://s3.rumptycloud.com",
  forcePathStyle: true,
  credentials: {
    accessKeyId: process.env.RUMPTY_ACCESS_KEY_ID,
    secretAccessKey: process.env.RUMPTY_SECRET_ACCESS_KEY,
  },
});

await s3.send(
  new PutObjectCommand({
    Bucket: process.env.RUMPTY_BUCKET,
    Key: "photo.jpg",
    Body: await readFile("./photo.jpg"),
    ContentType: "image/jpeg",
  }),
);
Store the secret in environment variables or a secrets manager. Revoke a key from the same tab at any time; apps using a revoked key lose access to the bucket.
6. Cleaning up
To remove a single file, open VIEW on the Assets tab and select Delete.
To remove the whole bucket:
- Open the bucket detail page.
- Select Delete bucket in the header.
- Confirm the bucket name if prompted.
This removes the bucket, every object in it, and every access key. There is no undelete.
Troubleshooting
| Problem | Fix |
|---|---|
| Upload area is disabled / SDK calls fail | Wait until the bucket status is READY. Creating buckets cannot accept uploads yet. |
| Public URL 404s | Confirm visibility is PUBLIC, the object status is READY, and you copied the URL from Asset metadata rather than guessing the path. |
| Private file opens in the browser without a signed URL | That should not happen for a private bucket. Check the visibility badge. If it says PUBLIC, create a new private bucket for restricted files. |
| Signed URL expired | Generate a new signed URL from the file inspector or from your server SDK. |
AWS CLI or SDK NoSuchBucket / auth errors |
Use the S3 bucket name from the detail page (the assets-... identifier), endpoint https://s3.rumptycloud.com, path-style addressing, and a key that has not been revoked. |
rumpty sync fails after you revoked a key |
Run the command again. The CLI should mint a new cached key. If it does not, create a key in Access keys and check you are logged in (rumpty login). |
| Bucket creation stuck on Creating | Use Refresh on the detail page. If status stays Failed, try a different name and check platform status. |
Conclusion
You now have an S3-compatible RumptyCloud bucket you can fill from the console, the Rumpty CLI, or any S3 SDK. Public files live on a CDN URL under https://assets.rumptycloud.app; private files stay behind signed URLs. From here you can keep product images in a public bucket, park backups in a private one, and wire the same credentials into a deployment or CI job.